Monday, April 28, 2014

New siding and a bit of brick

  
The old wood siding on the existing house is in really bad shape. Happily it is to be replaced with new cedar siding to match the old and the second floor addition and a tiny part of the first floor addition will also siding. The balance of the house is brick and the first floor of the addition will largely be glass and raised panels.


The new siding material is a gorgeous cedar material and it will have about a seven and half inch exposure--the vertical distance between the bottom of each piece and the start of the overlapping piece above. The existing exposure varied anywhere from seven and half to eight inches.

Beautiful material with mitered corners. Pity we have to paint it.
One of the things we had to decide was how to finish the outside corners. In the image above the boards are mitered, like a picture frame. While this looks beautiful, I think it looks too modern for our house. Another option is to do vertical trim pieces that the siding then butts up against. This can also look very nice, but one tends to see this more on older, wood-framed houses, or on newer, developer-built houses. Another way to deal with it is to lap the boards. That's what is currently on the house and what I think looks best for the age of our house. My other half was mesmerized by the mitered corners and was second guessing my decision until we walked through the gorgeous old Somerset neighborhood of Chevy Chase, Maryland and we saw one or two beautiful examples of lapped corners. So lapped it is.

Trimmed or butted corner. As in the siding butts up against the trim piece.

You can see the terrible shape the existing siding is in.
With this kind of lapped corner, one board overlaps the end of the other and it alternates.
This example of cedar shingles gives a good idea of how the lapped corners look.
There is one spot on the back of the house where and old window is being bricked in. Since it is in the middle of an existing field of brick the contractor wanted to make sure that the infill matched in size and color. So they have been salvaging brick from some of the demo areas.


Saturday, April 26, 2014

Wallpaper time warp Part II

 
I don't remember if I shared the story of the missing necklace with you all. After Lucy's Forever Home got going I got an email from Amy Speiser Vaughan who grew up in our house in the 1970s. Among other things she dropped me a line to see if were planning any changes to the stairs going up to the attic bedroom. When she was about 15 she lost a gold necklace between the cracks of the stairs and she has never forgotten about it.

Turns out we did plan to take those stairs apart, but so far nothing has been found. There is a subfloor with planks that have gaps between them below the stairs so it is still possible we may find it if that gets opened up.

After she first wrote me I asked Amy if she had any old pictures that showed the house. She was nice enough to scan some old snapshots and send them my way. It was really fun to see how the house looked in the 1970s and how it was used by the Speiser family. Amy was also nice enough to let me post this picture of her in the kitchen. You may remember my early post on wallpaper.

1970s Amy talking on what we children of the 70s refer to as a phone.
You can just see the corner of a breakfast nook table behind her arm. By the time we bought the house that nook had been turned into a powder room.
(Photo courtesy of Amy Speiser Vaughan)

The wallpaper uncovered.

The wallpaper preserved behind our new family room wall.

Monday, April 14, 2014

A lot of stuff we won't be choosing, and some we will

 
In the world of tile and stone finishes there are so many choices it boggles the mind. Even for those of us who have very strong ideas of what we want it is kind of hard not to notice and yearn a bit for wildly inappropriate, but beautiful options.

A whole lot of stuff we won't be choosing.

More tile and stone we won't be choosing. If our house was a bit more modern I would love some of those ceramic glazed brick-like tiles like the light blue tiles in chevron herringbone pattern and the white ones below that.

Totally wrong for our house, but that brown glazed tile is so beautiful.

If this small (maybe 2" x 4") glass subway tile wasn't so gosh darn expensive it would be a contender.

So many beautiful marbles but one has to be discipline to choose what's right, not just pretty.


A page from Waterworks' Keystone collection. The Carrara in the lower left corner is where we are headed.

I find the Zephyr in the upper right corner very tempting but would probably live to regret it.

This is the general direction we are going but probably has more veining in it than we want.

The ceramic 3" x 6" subway tile will be in the guest bathrooms but in white with matte white ceramic 1" hex tiles on floor. The Master shower enclosure will be honed Carrara subway tile in running bond with marble hex on the floor.

I would like darker grout similar to this for the ceramic subway tile.

This beautiful Ann Sacks image shows longer tiles, but the coloring of the tile and grout are very similar to what we will have in the master bath.

Progress Update

 
Remember the library? Doesn't look like that anymore.


Same view of the library without a floor, walls, or shelves.

When the house was built in 1934 this was a garage. Sometime after that they turned it into a library. A cold, poorly insulated library.


The original door from the garage/library was really, really narrow. The new one won't be quite this big when it is framed out but it will do a lot to integrate the room into the rest of the house.
New window for the maser bath.
 
The window openings at left and on the second floor will be bigger.

Nice to know the old mushroom wallpaper will be preserved for future generations behind the family room walls.
 
Footings for the new garage seen from the new second floor deck.

The existing slate has had a good run (80 years) so we decided to replace all of it. It is going to cost a big chunk of change but maintenance would cost even more. Seems like the right time. And I will say your welcome to some future owner of the house who won't have t replace this baby for a good 30-50 years after we move out.

HVAC ducts in the attic knee walls. Kind of looks like the start of a pipe organ. Hmm, now I have an idea.

Some of the old guts that will be replaced. I think this clearance means one fewer air return vents. Fingers crossed.

Saturday, April 5, 2014

How to spend a fortune on something you will never see

 
One of the most exciting and unexpected opportunities related to our house project is the installation of a geothermal heating and cooling system. Like many great opportunities, this one was borne out of necessity. As the design of our addition was getting into the final stages two things were clear: 1) We were going to need two air conditioning zones which would mean two outdoor compressor units; and 2) we had no room for either of them.
Nothing quite ruins a quiet summer evening like the sound of an AC compressor.
We wanted to keep the compressors out of the yard which meant they couldn't go in back where we plan terraces, gardens, and a pool. We couldn't add one to the driveway side of the house where the existing one is because the addition of the mudroom means there won't be any room. So we were left with sticking both of the units in a space on the same side of the house the screened porch right outside our brand new family room. Not an ideal solution. Then an HVAC contractor told us that there wasn't enough space anyway because the units needed more stand off from the house and each other to work properly and meet code. So what to do with the second one? Ugh. The only possibility was to put one on the second floor deck over the new kitchen and right next to our new master bedroom. Double ugh.

Then, like a knight in shining armor, our new contractor said "geothermal". I didn't know that to make of it. The only thing geothermal meant to me was a vague recollection that Iceland uses naturally occurring subterranean hot spots to heat buildings. What could that have to do with air conditioning? It doesn't. Let me try and sum it up as simply as possible:

  1. An anti-freeze like fluid is pumped in a closed tube loop into the earth.
  2. In the summer the fluid takes heat from the house and disperses it into the 55 degree Fahrenheit (13 Celsius) ground and returns chilled fluid to the house.
  3. In the winter the same fluid takes cold from the house and collects heat from the 55 degree ground. That is then compressed to hotter temps.
  4. The cooling process requires NO outdoor compressors whatsoever.
  5. Both heating and cooling makes domestic hot water as a by product so that, except for shoulder seasons when we don't use either, we don't pay anything for hot water.
  6. The systems typically reduce heating and cooling bills by 47%.
  7. Until 2017 there is a 30% tax credit with cap. That means that when spread over the cost of the whole HVAC system related to the geothermal we will get a tax benefit equal to the additional cost for installing the geotherm system (which isn't cheap). 

We jumped on the idea.


If you have lots of land you can have loops of tubes installed about 10 feet down in the ground across a broad area. If you have a city lot like we do the tubes need to be put straight down into the ground to provide enough energy transfer area.

In our case two wells had to go down 400 (yes, 400) feet.


Thankfully, both wells were drilled without encountering any groundwater. If that had happened the water would have been pumped into this tank that was waiting in the street.


Our neighbors had to put up with two days of drilling and our yard looked like hell.


The tubing waiting to be threaded into the 400-foot wells.

Add caption

When the excavation and back filling is completed, the black tubes coming out of the white conduit will be buried horizontally about four feet down and go into the heating/cooling system in the basement.
Geothermal can feed AC, forced hot air, and radiant heat. Our heat will be a combo of radiators and in-floor radiant heat. Here you see the forms for the installation of  in-floor heating tubes.
Much more on geothermal when the system is installed.


Friday, March 21, 2014

Shelf Esteem

 
Alas, I was not allowed to add something like this to the house even though it is perfection to me.
(Originally posted on My Porch after I saw the image at Pigtown Design)
As anyone who has ever looked at my regular blog My Porch will know, I love reading and I love books. In fact, I used to do a semi-regular feature called Shelf Esteem where I posted a picture of a home library taken from a design magazine. I would pull out my magnifying glass to try and figure out what books were on the shelf and to see if I could deduce anything about the owner and his or her reading habits. (Including trying to guess if the owner was a he or she.) I would also rank each room by its cozy factor. Was it a room one wanted to get cozy in? For me that mainly had to do with natural light, cushy furniture, and warm tones--often from the use of natural wood.

First comes inspiration
As with everything else related to our project we started with inspiration images that I culled from various magazines over the years.
This is like a smaller, more elegant version of the image at the top of this post.
A wonderful wall of books in warm natural wood tones with natural light.
Clearly the shelves of someone who reads. These are not decorator books.
I think the art and antiques make the shelves feel less messy than they might otherwise.

A guest room I would love to sleep in despite its rather cool palette.
I love that the shelves are sized to fit the owner's paperback collection.
As you will see later in this post, I pursued a similar level of customization when designing my new shelves.

We have been toying with the idea of having the interior of the shelves painted a different color, but I think I am leaning away from that idea. Although these shelves are good for oversize art books, I would not like them for my fiction collection. I like the look of art hung in front of books, but I don't think I could handle it in practice. I would forever be worried about the books hidden behind the art.
I know one of you will tell me the name of this designer hanging on the ladder.
Another example of messy shelves not looking messy.
What bookish person didn't want a library ladder when they were young?
Then comes the space
Inspiration pictures are well and good, but first you need space for your library. The good thing is that shelves can go on almost any wall. They look good in living rooms, family rooms, dining rooms, hallways, bedrooms, even bathrooms. If I was single I would probably have shelves in most of those rooms, but I am not, so my shelves are relegated mainly to one room. One of the big selling points when we bought our house in 2010 was that it had a room that was already kitted out as a library.

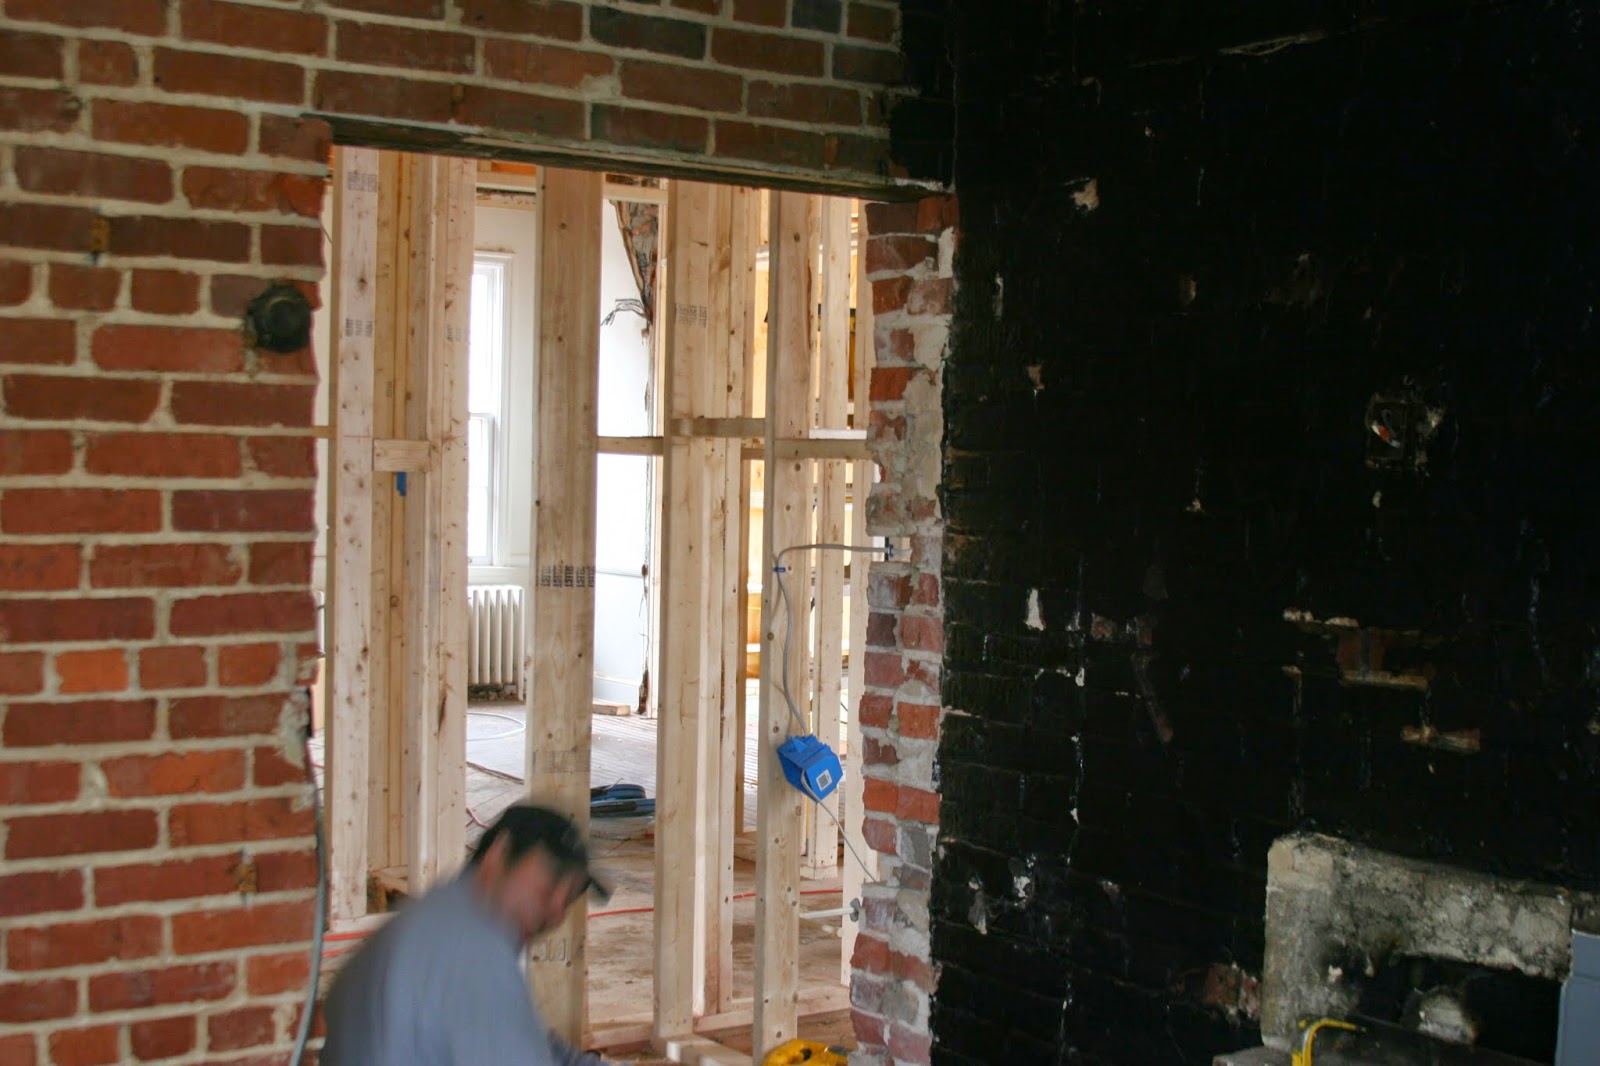
The room was originally the garage and was converted sometime probably in the 1940s or 1950s.
The wall at the end was once the garage door and let me tell you, it had very little insulation. The fireplace across the room wasn't much help against the drafts.
The shelves weren't thick enough or well-supported enough to hold the amount of books I would end up putting on them, but they certainly got my bookish imagination going when we saw the house the first time.
You can see the library with considerably more books in it. This was on a day when I decided to do a cull and a reorganization. Note the paint color samples on the wall behind the vase on the right. Soon after we bought the house we contemplated what color to paint the library but then we kept putting it off because our house renovation seemed imminent. The result was we lived with paint samples on the walls for almost two years. Then when we officially delayed our project, I decided to just go ahead and paint it the color I had chosen even though we knew the room would be demo'd within a year.

The reality of reality
So even though I actually owned a room that was a dedicated library, it had more than a few challenges.
  • It was cold in the winter. And to a lesser extent too warm in the summer.
  • It was narrow. I don't know how they fit a 1930s cars into a space that small.
  • It didn't get as good natural light as I had hoped. Overall kind of a dark room.
  • The shelves weren't very practical. They were fixed at different heights making it impossible to arrange my fiction in strict alpha order as some books were too tall to fit on the shelf where they should have been.
  • The raised grain wood paneling was pretty awful. It screamed basement rec room. Painting it the dark grey that I had chosen only made it worse.
  • The doorway into the room was a miserly 28" wide. And because it was originally the garage, the door jamb depth was crazy deep. All making it feel a little too 'converted' if you know what I mean.

One view of the library as I was packing it up prior to starting the house project.
Shows the fireplace as well as how the darker color only seems to enhance the basementy feel of the paneling.
The white patch just visible on the right was a spot I painted so I could put more paint samples up. My hope was to come up with a library color now so we wouldn't have to experiment later. We did narrow it down some, but nothing conclusive.

A cozier future?
I certainly hope so. We can't afford natural wood so the new raised paneling and the shelves will all be painted wood. Choosing the right color for this north facing room is going to be a challenge. But the room itself is going to be way more efficient and comfortable in general.

The basic layout of the room remains the same as before.  The only real change is the tall narrow bookcase to the right of the fireplace goes away. Perhaps the best thing about the room is that it will finally be properly insulated and have a radiant heat floor.

The fireplace wall without the little bookcase to the right. The old rec room paneling is replaced by new painted raised panels. The fireplace detail will have to be modified as the no-mantel-flush-with-wall look won't work.

What you will see first when you walk in.

This is the wall at the front of the house where the garage door once was. I have made these shelves deep enough and tall enough to hold oversize art books.

I laid out these shelves so that I could maximize book storage. These are not your typical book shelves. Since this whole wall will be dedicated to fiction and regular sized non-fiction, I didn't need the typical 12 inches of vertical clearance on each shelf. The tallest hardcover fiction is about nine inches, so even at 10.5 inches they will still have some room to breathe. I am also having the shelves made shallower. In this narrow room this will add two inches of floor space but keep the shelves deep enough for the books I want to put there. And the existing doorway will be eight inches wider than its current 28.

The devil is definitely going to be in the details in this room. Since we can't afford natural wood which would warm up the room, I am not sure what we are going to do about color. I didn't really like our experiment with a darker color, although I think any color will look better on the new smooth raised panels than it did on the rustic raised grain paneling that was in the room. The right furniture arrangement for the room will also be a challenge. Having both George Smith club chairs seemed a bit much for the room. We may have to find something smaller, and I would love to squeeze in a round library table with at least two chairs.  I doubt I will ever be happy with the natural light. I might end up reading in other parts of the house that get better light--at least during the day. But I can't wait to install my books on the new shelves.

What does Lucy think?
The front window of the library has been one of Lucy's favorite spots. The cabinet height comes right up to the bottom of the window so it is a perfect place for her to perch. The probably is she gets the window dirty and it gives her too much of an opportunity to get worked up about people passing and approaching the house. She just goes nutso. I think we are going to keep stuff on that surface in the future and/or have shutters where we can keep the bottom of the window closed to keep her from not only going up there but also wanting to be up there.

How can we deprive her of her favorite spot? She will just have to content herself with looking out all the French windows at the back of the house. I know the mailman will appreciate her not being in that window.